How to structure your video game modules
This is part 1 of the multipart Trap Labs Code Design and Architecture series
One of the most often asked question by beginner programmers is, “How do I structure my code?” or “Where do I start designing my code?”. There is nothing worse than staring at a blank screen, watching the cursor blinking at you, mocking you, not knowing where to start. Someone should make a game about that.
Unfortunately, there is no correct answer to this question. The answer is a vague, “It depends”. The way you plan two similar games could have vastly different designs and architecture. For example, you can probably get away with little design for a one button runner game, but if you want the runner game to have customizable character through microtransactions then it would greatly benefit from some upfront design.
What I hope to accomplish through this article is to give you some guidelines on where to start, and layout some ground rules on high level code design and architecture before you start coding. In later parts of the series I will go in detail on some of the major modules in Trap Labs to guide you through the structuring process. Just remember that design and architecture is not a topic that has cookie cutter methods that you can follow. You can learn the design principles and patterns, but the execution and the application will vary from project to project. The only way to become good is to do many projects and practice...or you could just be extremely gifted, that works too.
High level architecture
Have you written down what kind of feature you want your game to have yet? If you haven’t it should be the first you want to do. Spend some time and write out something like the game technical features from the intro of the series but with more details. I personally recommend writing out as many features and requirements as you can, then pick the most crucial items and put them on a separate list as “core”. Start developing your game based off these core features. My reason for doing this is the more info you have on the behavior of your game, the more aware you can be about the design decisions that goes into the core. For certain features you may wish to defer the design or implementation decisions until you actually need to build it, and knowing this can help you with make good design decisions for the core modules. This concept is encompassed by the Open Closed Principle (OCP), which states, “Modules should be built open for extension but closed for modification”, basically allowing you to defer design decisions until you need them.
For example, you might write down features such as customizable character and microtransactions. But microtransactions are not required as a part of the game play, so put customizable character as core. Knowing that you want to have microtransactions in the future, you need to design the character system in such a way that will allow you to plugin microtransactions in the future. This way you can defer implementation of features until you actually need them. I will go over a specific example from Trap Labs using OCP later on the series.
Secondly, do not make assumptions about features that you have no technical knowledge of. For example, if one of your requirement is “16 people multiplayer”, then you should not assume that you can design a single player game and convert it to a multiplayer game later. This is a common mistake among amateur developers, and you often end up with a rewrite if you make the wrong assumption. If you intend to make a multiplayer game you need to design your game to be multiplayer to begin with. Alternatively, if you are making a single player game but want to have the option of changing it to multiplayer, then you need design player system such that it's open for extension. If you are not sure of the technical requirements, then do some research on the subject before you proceed.
Lastly, it is also advantageous to figure out some early hierarchical dependencies. For example, steering physics and pathfinding are both important aspects of the gameplay, but pathfinding is not useful until steering is added. This will help you prioritize which features to develop first.
Breaking down the libraries
Once you have the features down, take a look at what features can be developed without the game engine. These will be apart of your unit testable libraries. So obviously don’t start with “OMG SCREEN SHAKES WHEN FIRING MA LAZER”.
Let’s take a look at Trap Labs. For me there were some immediate standouts:
- Importable/exportable maps – mostly likely data structure heavy classes, no need for game engine
- Pathfinding – completely unit testable and does not need the game engine
- Networking engine – when I started this one was a maybe. I wasn’t sure if it was realistic to make a network engine that worked well without coupling to the game. I was betting that at least 90% of could be decoupled. It ended up being 100% as you’ll see in Part 5.
- Knowing that I wanted to use the dedicated server model, I have to separate physics simulation from the game engine. This means that physics and command management must be decoupled
In fact, from experience I was fairly confident that most of the game can be written decoupled from the game engine. If you are not sure then spend some time and do some research and brainstorming. For example, if you want to use ridged body physics from Unity and not write your own, then you need to beware that any module that has physics in it is potentially coupled to the game engine. This also gives you a good opportunity to start thinking about what kind of layer would you need to interface with Unity’s physics in order for your code to remain testable.
Once you broke down the high level features it is a good time to do some planning on some of the potential modules and classes that your game might have. This is a good time to draw some UML diagrams and scope out some of the important relationships between them. Now don’t confuse this with BDUF (Big Design Up Front). You shouldn’t be writing out every little class that your game would have or how they link together. This has been to shown to not work at all. Let’s use the space invaders example again. A high level design that I might do would look something like this:

I kept this very vague on purpose, and so should you. If you are not familiar with UML don't worry about it as I'm very loose on the notation here. All you have to know is the arrow means this uses that (i.e. ScoreKeeper uses GameEntities). I’ll go over my thinking process with you:
- Immediately off the bat I know that there needs to be some physical game elements like cannon, bullet, enemy etc. Enemy is an interface because there bound to be different types of enemies
- It’s a good idea to keep game entities as their own module
- Rather than having the game elements perform their own physics, there should be a separate physics system that moves the elements (as a part of the game loop). This way there is a clear separation of responsibilities of the modules and I have greater control over the gameplay
- Score keeping should have nothing to do with the gameplay, as it’s sufficient to simply observe the enemies that were destroyed and apply scoring
- Levels are probably going to be generated in some fashion using the fortress and enemies, perhaps arranging them in some fashion
- I’m not sure what’s in the game loop yet, but with any game engine you are going to need some updatable core so you can update the game logic
- The diagram shows the modules coupled to Cocos2d-x uses the GameLoop. It is implied that there is some interface that decouple the framework so the actual relationship should be reversed.
I also didn’t add classes like the visual classes for each game entities because I don’t yet know what they would look like. Knowing how to decouple the framework from part 0, these decisions can be deferred without affecting the game core. In addition, the game loop and physics system a bit much to work out right now, so I’ll see if I can get a better idea once I get there and have the tests help drive the design. Just remember to not go overboard with the design as you will discover that certain assumptions you made about the architecture won’t be correct down the road.
This should be more than enough to get you started. It took me maybe 15 mins to come up with this diagram. For a larger game you should definitely spend more time. The obvious modules that you might want to consider building as separate libraries are groups like GameEntities, LevelController, ScroreKeeper. Keeping them as separate libraries will allow you take making better packaging decisions as you build the final executable. Its’s certainly also fine to build the whole game as a single library and extract them as needed.
The key to doing this part well is experience. Unfortunately, there is no cookie cutter methodology you can follow. So practice a lot and know your design patterns so when the situation arises you can make the best decision for your game. The best software architects will get certain things wrong and that’s why software works best on an iterative cycle so you can fix design and architecture problems quickly. Another mistake that some programmers do is purely let the tests drive their design. This is also very dangerous because there is certain knowledge about software architecture you should know from experience. For example, if you were making a multiplayer game then you might consider using some sort of multiplayer command engine (described in part 3 of this series). But if you want your game to have instant replays then this means that a command system is pretty much required. I'm not saying there arn't other ways to record gameplay, I'm saying the combination of multiplayer and instant replay would perfectly fit a command based system.
Intermission rant: but but but but I want to see my game!
If you follow my guidelines, you’ll see that you don’t get to “see” anything working from your game for a while as you’ll be building libraries and unit tests first. For many developer this is discouraging and demotivating because they really want to see their creations “come to life” immediately. I understand, you really want to see that exploding animation when the kitty lands on a spike wheel and feel good about your psychopathic tendencies.
I personally don’t agree with this sentiment, and I would encourage you to not nurture this feeling if you want to become a great software engineer. This is one of the major reasons game developers likes to give on why they don’t write tests for video games, because they need to “feel” the game, and it’s not practical for them to write tests because things need to be constantly adjusted. There are few big problems with this argument and I’ll point out why.
Firstly, do not misunderstand what unit tests are for. Unit tests are to verify the correctness of your code, not how the game feels. When you talk about a game feels you are probably talking about the smoothness of the physics, the responsiveness of the keys, the timing of the animations etc. These should not be unit tested. They are for humans to verify, and they are creative aspects of game design.
For example, if you are making a racing game one of the things that you might adjust constantly is the acceleration ramp when gas is applied. You shouldn’t be writing a test to verify the acceleration curve feels right. You should instead test for things like: did the car accelerate after gas is applied (by difference in position or velocity)? Or did the car move in the direction of the acceleration? So please be very clear about what unit tests are for, and they are for verifying logic. Things that you need to tinker with constantly like the UI or feel should be manually tested.
Secondly, just because you don’t see anything doesn’t mean the element is not working. If you wrote your tests and they pass it means that the element you just built work as you coded, at least from a logical standpoint. In my opinion from a feature completion standpoint, this is a better measurement than manually checking if something is working or not. So you should have more confidence and motivation about your game, not less.
Last thing I want to add is the separation of responsibilities of team member roles within the project. Remember how I talked about the importance of decoupling from the game engine? It's similar in a way that if you depend your code on the feel of the game, then your project is tightly coupled to the creative members of your team. You don’t want to be locked to your artist for every little step you make for the game because you need to feel if it was right. If you can design the code well and not have the its correctness dependent on the “feel” of the game, then you can delegate work among coders and artists to maximize their efficiency. I’m not saying they shouldn’t talk to each other. I’m saying their work does not need to be so tightly dependent on each other’s work. This applies to all creative members: artists, sfx guy, level designer etc.
Whether or not you agree or want to listen is up to you. Just remember that once you pick up development velocity you will eventually get to the point where you are flipping back and forth between unit tests and the actual game. Doing it my way just takes a bit longer before you see anything on screen. And from my experience it will only make you go faster, not slower.
Trap Labs’ modules
I know it’s a bit unfair to talk about the modules of Trap Labs after I built them. But my initial design and the outcome didn’t turn out too much different. The biggest surprise was that I extracted the command system into its own standalone library which I’ll talk about in detail in part 3.
Here’s a very vague hierarchical diagram of the Trap Lab’s architecture. I won’t include any specific classes here as I’ll talk about them in detail in the later parts.
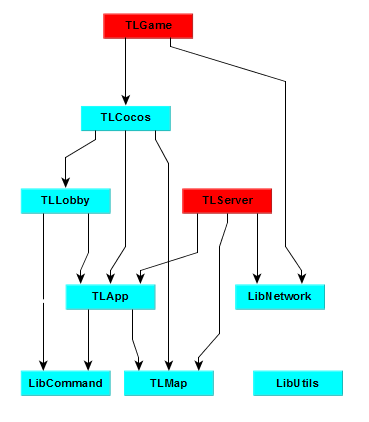
Trap Labs is built upon 7 custom libraries:
- TLApp – game engine and core
- TLMap – map entities
- TLLobby – ditto; still work in progress
- TLCocos – testable audio and visual library tailored for communication with Cocos
- LibNetwork – protocol agnostic networking engine
- LibCommand – multiplayer command execution engine
- LibUtils – common shared utilities
And two executables:
- TLGame – Cocos project that builds the game client
- TLServer – dedicated server, OS dependent Aside from Cocos2d-x libraries, the only other external library worth noting Boost Asio used for networking IO.
You may have a different interpretation and design that may work even better. The important takeaway is all 7 modules are decoupled from the game engine and unit testable. This means that if there is a need to extract or modify the architecture then the tests will assit me in doing so. It also perfectly jives with the client and dedicated server model as the game logic is decoupled from the engine. The executables on the other hand needs to be manually tested through playtesting because they are the tightly coupled to the engine or the OS.
TLMap
TLMap was the first library I wrote because it was obvious to me that this library sits at the bottom of the hierarchy and is mostly entity/data structure classes. A map is N x M grid that served as the data structure for pathfinding, and elements such as floor tiles and trap can be placed on top. It was clear this could be built without the game engine. I go in detail about this library in the next part (part 2).
LibCommand
LibCommand is a multiplayer command manager, scheduler, delegation and execution unit. Originally I actually embedded the functionalities of this module inside TLApp. After much refactoring I deemed it worthy to stand as its own module, and became a reusable general purpose command engine. This ended up extremely useful because the lobby module uses this library as well. I go over this module in detail in Part 3.
TLApp
I started on this library after TLMap was somewhat useable. This is Trap Labs’ game engine. Game command and execution, physics, event system, and all important things happen within here. It was crucial that I kept the core the game testable because all the important logic happens in here. At this point I already have a Cocos executable to visually try out things like physics and path finding. This library is talked about in detail in Part 4.
TLGame
This is the game executable that links together all of the libraries above. You know this as TrapLabs.exe on Windows. I should stress that this project has NO game logic because all game logic is in TLApp. Most of the logic involved is in the instantiation and initialization of audio and visual elements. Majority of the code is setting up animation, audio, or providing implementations to interfaces for dependency inversion from TL* libraries. I briefly go over a few examples of classes and even though this is untestable, I show you some ways to rapidly test certain visual element in Part 4
TLServer
The dedicated server executable. This is the sever that runs the actual simulation and relays in the game states to the clients. Notice this module has no dependency on Cocos at all. It’s high performance and low memory consumption. The entire project is only about 300 lines of code.
TLLobby
TLLobby manages the game lobby and room creation system. All it does is pass reliable question and answer between client and server to negotiate and create rooms. The room architecture is based on early Battle.net lobby system from StarCraft and Diablo II. This module is still work in progress so I won’t be talking about this module in this series.
LibNetwork
At the time the only viable third party choice seemed to be RakNet. But it wasn’t open source back then and a license was something like $2000. Screw that! For $2000 I could write my own. So I did. This is a multithreaded asynchronous networking library that is protocol and game agnostic, handles network congestion, reliability, order and features a simple firewall. It’s fully testable and I can simulate various networking conditions for stress testing without the need for expensive equipment. I will talk about this library in Part 5. Consider it as an addendum to Gaffer on Games’ networking series.
LibUtils
All the utilitiy classes like geometry and reusable interfaces resides in this library. They are used in almost every library. I would expect every project to have a utility library because it’s super convenient. I won’t discuss this library.
Where to go from here
Once you work out your high level designs you can start coding. I would suggest starting from:
- Concrete classes that are at the bottom of the dependency graphs. These are basically classes that you know for sure exists, like a Cannon or Fortress class that has no major outgoing dependencies. Entity classes are a good category to start as well. For Trap Labs I started with TLMap as explained. Just remember to write your test first.
- Interfaces that wires up your modules, such as the mediators, or classes that reside on boundaries. This is the kind of classes you hook up the relationship between classes and modules but they have no implementation. Your tests would simply instantiate them with mocks to verify the wirings. For example, you are using a command system then you might want to see if submitting dummy commands would execute through the system once you submit it.
Still don't know where to start? Let's go to Part 2 and see how I made TLMaps.